I just finished filling a single order for seven Memento Vitae and as much as I enjoyed making them, I’m ready to do something new and unrelated to jewelry for awhile!
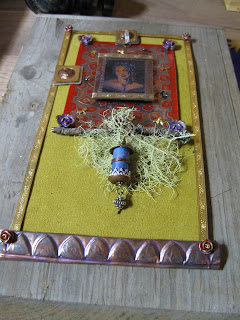
I have a small etching I did awhile ago using my daughter’s high school senior picture. I love this image of her, but the piece is a bit big for jewelry, in my opinion. I took a cue from a very cool book I’ve been reading by Laurie Mika, “Mixed-Media Mosaic” and thought perhaps this little image might be a good place to start. I began with the idea of a mosaic, as my drawing shows, but the longer I worked and the more I thought about it, the less inclined I was to add tiles as described in the book. I considered making my own tiles out of enamels or even buying some "fimo" or "sculpey" and making them as directed by Laurie Mika. I knew I needed a frame but the thought of all that time making little tiles was unappealing. I wanted this to be fun and spontaneous, not laborious.
Tile making might be something to think about, but later!
What I needed first was a base to mount everything on. I live out in the boonies and buying something would require several hours in the car. Instead, I went outside and dug around in our stash of kindling. I found part of a board we had pulled off the side of the house that had once been used as a kitty-cat entrance -- purr-fect!
I had a sample pattern from a salt-water etching workshop I'd taught that really appealed to me. So, I etched another, larger piece of copper for the background for my little "Madonna Retablo". I left the red, paint resist and also added LoS to get some more color, depth, and iridescence.
So it went . . . I would dig in my many boxes of ephemera and jewelry projects for things that might possibly fit into my theme. Eventually, my piece began to take form. I held onto some elements of my original drawing but also let others go. I laid the collection out on my board, rearranging for hours.
I eventually realized it needed more depth, so I added another layer of copper to frame it all. I colored the copper sheet with heat and lightly ruffled the edges with my round nose pliers. I then decided I would place a piece of foam core under the copper to raise it all off the wooden board. Much better!
As a jeweler I avoid glue. I know it eventually fails, so I wanted to try to rivet or nail as much as I could. I riveted the madonna onto the etched copper piece first, then mounted the etched piece with the "madonna" onto a copper backing with a piece of leather in-between. I then made the three stations which were based on a bracelet link I’d made earlier. I then riveted those elements onto the copper and leather base, trying to space them evenly beside the etched image. It was then time to put on the frame: a brass, patterned, bezel strip, that I secured with rivets.
I wanted to include a natural element and had a branch with moss that was very delicate. I sprayed the moss and branch with a matte finish acrylic, then wrapped the branch with some twisted copper wire to strengthen it.
I also wanted to add a little vessel I had made, pictured above, and needed some way to attach it so it would swing freely. I drilled 4 holes in the copper base, two on each side of the branch and looped it over the branch and twisted it on the back of the copper base.
 |
Once I had everything securely in place, I mounted the entire piece onto my wooden board, sandwiched over a piece of foam core. In pre-drilled holes I nailed the entire piece onto the board. My placement of nails was based on where I planned to add little bees and dragonflies below the “madonna” image and in each corner. I then glued flowers on the corners and bugs on the nail heads.
I truly enjoyed working in a different manner with a new mix of materials!


