Monday, May 27, 2013

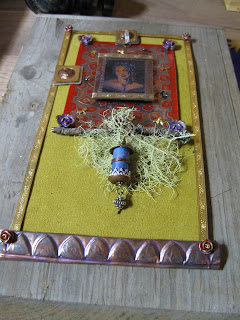
Madonna Retablo: A Mixed-Media Project


I just finished filling a single order for seven Memento Vitae and as much as I enjoyed making them, I’m ready to do something new and unrelated to jewelry for awhile! 


I have a small etching I did awhile ago using my daughter’s high school senior picture. I love this image of her, but the piece is a bit big for jewelry, in my opinion. I took a cue from a very cool book I’ve been reading by Laurie Mika, “Mixed-Media Mosaic” and thought perhaps this little image might be a good place to start.  I began with the idea of a mosaic, as my drawing shows, but the longer I worked and the more I thought about it, the less inclined I was to add tiles as described in the book. I considered making my own tiles out of enamels or even buying some "fimo" or "sculpey" and making them as directed by Laurie Mika. I knew I needed a frame but the thought of all that time making little tiles was unappealing. I wanted this to be fun and spontaneous, not laborious. 

Tile making might be something to think about, but later!  


What I needed first was a base to mount everything on. I live out in the boonies and buying something would require several hours in the car. Instead, I went outside and dug around in our stash of kindling. I found part of a board we had pulled off the side of the house that had once been used as a kitty-cat entrance -- purr-fect!  


I had a sample pattern from a salt-water etching workshop I'd taught that really appealed to me. So, I etched another, larger piece of copper for the background for my little "Madonna Retablo". I left the red, paint resist and also added LoS to get some more color, depth, and iridescence.


So it went . . . I would dig in my many boxes of ephemera and jewelry projects for things that might possibly fit into my theme. Eventually, my piece began to take form. I held onto some elements of my original drawing but also let others go. I laid the collection out on my board, rearranging for hours. 


I eventually realized it needed more depth, so I added another layer of copper to frame it all.  I colored the copper sheet with heat and lightly ruffled the edges with my round nose pliers. I then decided I would place a piece of foam core under the copper to raise it all off the wooden board. Much better!

As a jeweler I avoid glue. I know it eventually fails, so I wanted to try to rivet or nail as much as I could. I riveted the madonna onto the etched copper piece first, then mounted the etched piece with the "madonna" onto a copper backing with a piece of leather in-between. I then made the three stations which were based on a bracelet link I’d made earlier. I then riveted those elements onto the copper and leather base, trying to space them evenly beside the etched image. It was then time to put on the frame: a brass, patterned, bezel strip, that I secured with rivets. 


I wanted to include a natural element and had a branch with moss that was very delicate. I sprayed the moss and branch with a matte finish acrylic, then wrapped the branch with some twisted copper wire to strengthen it.
I also wanted to add a little vessel I had made, pictured above, and needed some way to attach it so it would swing freely. I drilled 4 holes in the copper base, two on each side of the branch and looped it over the branch and twisted it on the back of the copper base.


Once I had everything securely in place, I mounted the entire piece onto my wooden board, sandwiched over a piece of foam core. In pre-drilled holes I nailed the entire piece onto the board. My placement of nails was based on where I planned to add little bees and dragonflies below the “madonna” image and in each corner. I then glued flowers on the corners and bugs on the nail heads. 


truly enjoyed working in a different manner with a new mix of materials!


Wednesday, March 20, 2013

Published!

After a long wait my article for Art Jewelry Magazine will soon be on the newstands! Are there still newstands? Anyway, check out my first publication! Now I am psyched to write another.  I have several ideas, it will just take some time to get it done. I am so slow writing, as you can tell by my intermittent blog posts.

I have to thank my husband for the all professional help he gives me not to mention his moral support and his belief in the value of my work! I'm one lucky woman.

Thursday, May 17, 2012

Writing Step-by-Step Tutorials

I had, what I thought, was a great jewelry project. ( I've talked about it in the previous blog.) When Art Jewelry Magazine put out a call for jewelry made from material purchased at the hardware store, I decided I should pursue it further and submit an image of the finished piece. Unfortunately, my piece didn't make the final cut for their online gallery. When I didn't make it into the gallery I figured that was the end of it.  However, as I said, I thought it was a great project, so when I sent in the image, I also sent in a project proposal.

Within a week I received a letter from AJM stating they reviewed the project proposal and would like to publish it! Well, you could've knocked me over with a feather! I just wasn't expecting that! I was thrilled, of course, and couldn't wait to get started!

I had made several of these pendants and thought I knew from memory all the steps I'd gone through to complete it. I had also kept notes when I made it so I had my little note card, meant just for me, to help jog my memory if I needed it.  A piece of cake, right? ... HA!  I had no idea how difficult it was to explain a process, without the benefit of demonstrating it. Sure, I was going to have pictures, but they wanted those later, after the manuscript was done.

Ever try to describe something technical to someone whom you assume knows nothing about what you are talking about? This is what I needed to do. Luckily, I had someone in my midst who was the perfect reader, my husband. He didn't know a dapping block from a disc cutter! Just the guy I was looking for!

I  then began to laboriously describe my fabrication process. I needed to write instructions on how to anneal and dap a copper ring, cut a disc, measure gallery wire, solder a bail, polish metal and take an inch of wire and turn it into a heart not to mention how to put it all together! I realized, if my husband couldn't understand it, I knew it had to be clearer.

Oh, did I mention my "reader", besides being a real trooper for helping me, is also an English Professor with many years of editing? How very, very convenient! Boy, oh, boy, edit he did!  He would sit behind me as he made me read out my most recent scribblings.

Reading aloud really helped to make it clear just how unclear my writing was! He also helped me see just how often I use the very vague words "it" and "this".  He told me when he was teaching and correcting papers he became so tired of the over use of "it" he began putting (sh) before "it" to let the student know just what "it" was really worth.  I have to admit I received more than my share of (sh).

Along with submitting the manuscript I had to submit a couple of sample process photos.  The editor needed to make sure they were acceptable before I went through the work of making the piece and photographing it all. I had to make just a few adjustments before they were fine for the article.  Next post I will continue from this point,  Photographing Project Fabrication.

Monday, January 30, 2012

Learning From My Mistakes!

After making the pendant in the previous post I thought it was worth a repeat. It's always good to make something several times. I'm glad I did, too. I discovered a better sequence for my soldering. I used to solder the center silver disc last while holding the pendant by the bail. I knew this could be a problem if I wasn't fast enough with my soldering. Guess what...I wasn't,  and the piece fell apart and I was left holding nothing but the bail in my tweezers and the disc still wasn't soldered in place and my gallery wire broke off!
Since I was forced to basically begin again I could rethink my sequence- which I needed to do! so- Where to put the solder? Initially, I put paste solder along the disc and pushed it in place and soldered it, but since the disc wasn't soldered I had to rethink it. The second time I put the paste solder in the copper piece and then pressed the disc in place. This time, rather than have the paste squish out on top, it went inside the ring, where it needed to be.  This was now my first solder (after soldering in my little heart in the center of the disc). My second solder was the gallery wire and then the bail. MUCH better!!

This is why I try not to get too bent out of shape when things screw up. I might actually learn something from my mistakes!!

Saturday, January 7, 2012

Help, I'm a Sponge!

Okay, I have to admit it, at least to myself, I'm a sponge. I mean this only in the degree that my work is influenced by my environment, casual reading, conversations, dreams: you name it, it all creeps into my work. I can't help it.
Here's a for instance. Many of the things I was looking at around Halloween also included images and celebrations of Dia de los Muertos. I also had been looking at the work of Lorena Angulo. I love her work!! We are in some of the same groups on facebook, so I kind of keep tabs on what she is doing. (Lorena, I promise I am not stalking you!!)
I wish I had a side view with the
 decorative silver gallery wire but alas I don't
 and the piece is now winging it's way south to Texas!
I had decided earlier I needed to try out some new, less expensive materials. I bought some copper pipe fittings thinking I might be inspired to do something with them. As I was working I noticed my aesthetic had shifted a bit and realized I was unconsciously thinking about Lorena and her work, which is beautifully entrenched in Mexican culture. Even though the piece I was working on didn't have the same elements of birds and flowers that Lorena's does, I still felt her work helped to inform mine. I like to think of it as inspired by her. I think the pendant turned out pretty cool and I wish I had a side view to show you just how influenced I was!!  None the less, I will continue to explore the design.  

 And thanks Lorena!

Friday, July 29, 2011

Worthy Cause

I have discovered through MetalsmithsUnite! 2.0, which is a jeweler's group I belong to on facebook, that there is a program called Made By Survivors. This program's aim is to help women and children who are victims of sex trafficking, learn a trade. This is also a place where they may begin to heal and no longer just survive but thrive. Here is a link to a wonderful post made by Dianna at the request of MetalsmithsUnite! http://metalsmithsunite.blogspot.com/2011/07/working-with-made-by-survivors.html   I hope you take the time to read.

The director, Dianna Badalament is now conducting her Third Jewelry Tool Drive. She has published a list of the needed tools which you can access here http://www.madebysurvivors.com/content/third-tool-drive. I plan to do my part to help by donating some tools from her list, it's the LEAST I can do.

Monday, June 6, 2011

Meditation Mandala

This is one of my recent mandalas. I've been hunkered down at my bench a lot lately and I needed to give myself a break. This is inspired by my morning meditation and my on-going interest in Buddhism and mantras.